The Definitive Guide to Yii 1.1
0 follower
Code Generation using Command Line Tools (deprecated)
Note: The code generators in
yiic shellhave been deprecated since version 1.1.2. Please use the more powerful and extensible Web-based code generators available in Gii, instead.
Open a command line window, and execute the commands listed as follows,
% cd WebRoot/testdrive
% protected/yiic shell
Yii Interactive Tool v1.1
Please type 'help' for help. Type 'exit' to quit.
>> model User tbl_user
   generate models/User.php
   generate fixtures/tbl_user.php
   generate unit/UserTest.php

The following model classes are successfully generated:
    User

If you have a 'db' database connection, you can test these models now with:
    $model=User::model()->find();
    print_r($model);

>> crud User
   generate UserController.php
   generate UserTest.php
   mkdir D:/testdrive/protected/views/user
   generate create.php
   generate update.php
   generate index.php
   generate view.php
   generate admin.php
   generate _form.php
   generate _view.php

Crud 'user' has been successfully created. You may access it via:
http://hostname/path/to/index.php?r=user
In the above, we use the yiic shell command to interact with our
skeleton application. At the prompt, we execute two sub-commands: model User tbl_user
and crud User. The former generates a model class named User for the tbl_user table,
while the latter analyzes the User model and generates the code implementing
the corresponding CRUD operations.
Note: You may encounter errors like "...could not find driver", even though the requirement checker shows you have already enabled PDO and the corresponding PDO driver. If this happens, you may try to run the
yiictool as follows,% php -c path/to/php.ini protected/yiic.php shellwhere
path/to/php.inirepresents the correct PHP ini file.
Let's enjoy our work by browsing the following URL:
http://hostname/testdrive/index.php?r=user
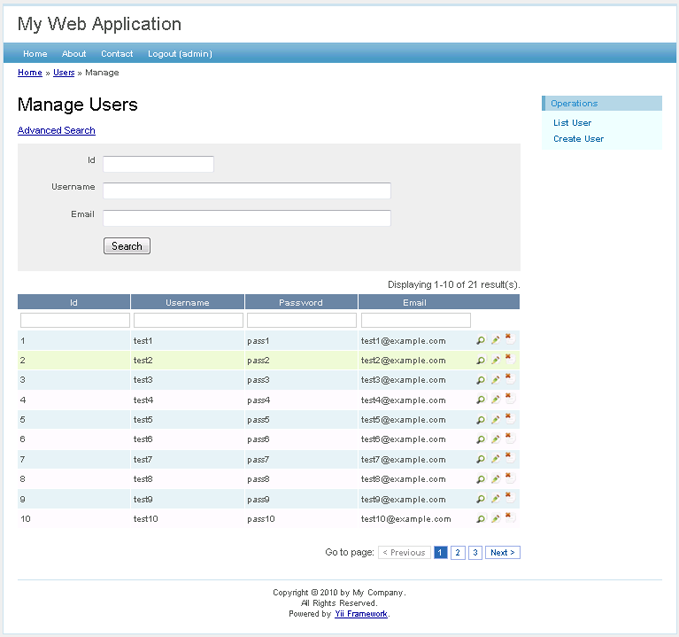
This will display a list of user entries in the tbl_user table.
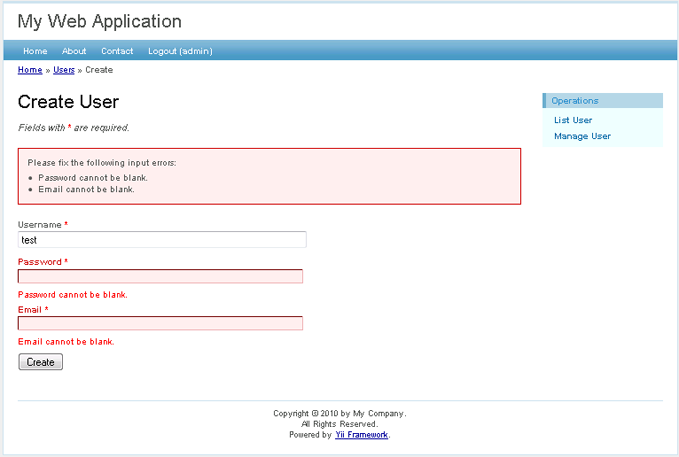
Click the Create User button on the page. We will be brought to the login
page if we have not logged in before. After logged in, we see
an input form that allows us to add a new user entry. Complete the form and
click on the Create button. If there is any input error, a nice error
prompt will show up which prevents us from saving the input. Back to the
user list page, we should see the newly added user appearing in the list.
Repeat the above steps to add more users. Notice that user list page will automatically paginate the user entries if there are too many to be displayed in one page.
If we login as an administrator using admin/admin, we can view the user
admin page with the following URL:
http://hostname/testdrive/index.php?r=user/admin
This will show us the user entries in a nice tabular format. We can click on the table header cells to sort the corresponding columns. We can click on the buttons on each row of data to view, update or delete the corresponding row of data. We can browse different pages. We can also filter and search to look for the data we are interested in.
All these nice features come without requiring us to write a single line of code!
User admin page
Create new user page
Found a typo, or you think this page needs improvement?
Edit it on GitHub !
Signup or Login in order to comment.