Yii 2.0 الدليل التقني الخاص ببيئة العمل
This section is not translated yet.
Please read it in English and consider helping us with translation.
Please read it in English and consider helping us with translation.
0 follower
Console applications 
Besides, the rich features for building web applications, Yii also has full-featured support for console applications which are mainly used to create background and maintenance tasks that need to be performed for a website.
The structure of console applications is very similar to a Yii web application. It consists of one or more yii\console\Controller classes, which are often referred to as commands in the console environment. Each controller can also have one or more actions, just like web controllers.
Both project templates already have a console application with them.
You can run it by calling the yii script, which is located in the base directory of the repository.
This will give you a list of available commands when you run it without any further parameters:
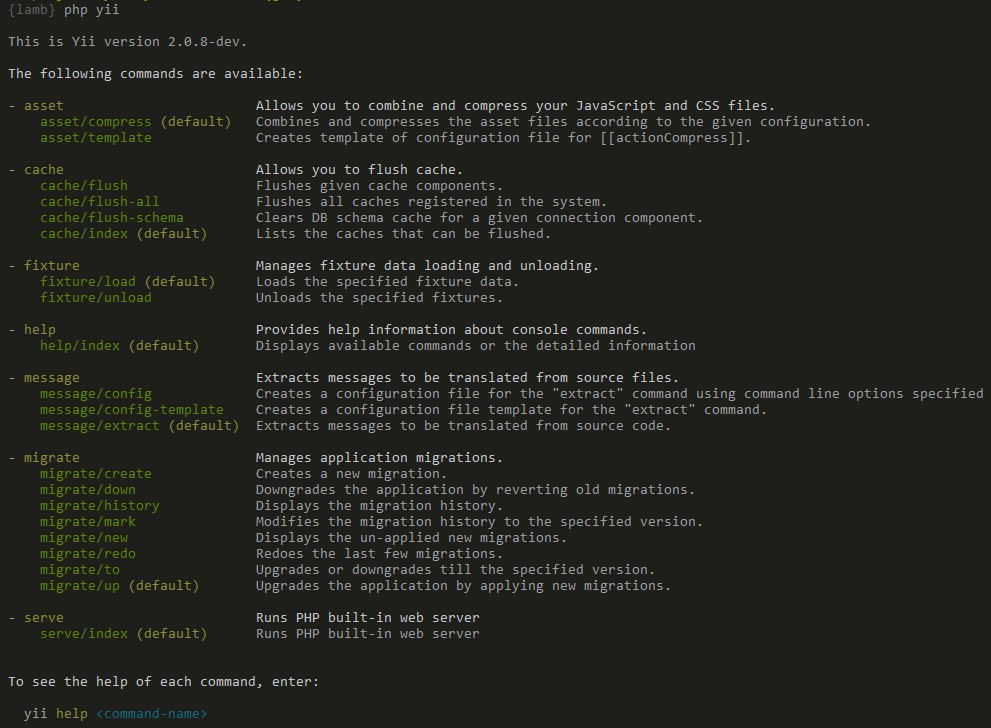
As you can see in the screenshot, Yii has already defined a set of commands that are available by default:
- AssetController - Allows you to combine and compress your JavaScript and CSS files. You can learn more about this command in the Assets Section.
- CacheController - Allows you to flush application caches.
- FixtureController - Manages fixture data loading and unloading for testing purposes. This command is described in more detail in the Testing Section about Fixtures.
- HelpController - Provides help information about console commands, this is the default command and prints what you have seen in the above output.
- MessageController - Extracts messages to be translated from source files. To learn more about this command, please refer to the I18N Section.
- MigrateController - Manages application migrations. Database migrations are described in more detail in the Database Migration Section.
- ServeController - Allows you run PHP built-in web server.
Usage 
You execute a console controller action using the following syntax:
yii <route> [--option1=value1 ... argument1 argument2 ... --option2=value2]
Options could be specified in any position.
In the above, <route> refers to the route to the controller action. The options will populate the class
properties and arguments are the parameters of the action method.
For example, the MigrateController::actionUp()
with MigrateController::$migrationTable set to migrations
and a limit of 5 migrations can be called like so:
yii migrate/up 5 --migrationTable=migrations
Note: When using
*in console, don't forget to quote it as"*"in order to avoid executing it as a shell glob that will be replaced by all file names of the current directory.
The entry script 
The console application entry script is equivalent to the index.php bootstrap file used for the web application.
The console entry script is typically called yii, and located in your application's root directory.
It contains code like the following:
#!/usr/bin/env php
<?php
/**
 * Yii console bootstrap file.
 */

defined('YII_DEBUG') or define('YII_DEBUG', true);
defined('YII_ENV') or define('YII_ENV', 'dev');

require __DIR__ . '/vendor/autoload.php';
require __DIR__ . '/vendor/yiisoft/yii2/Yii.php';

$config = require __DIR__ . '/config/console.php';

$application = new yii\console\Application($config);
$exitCode = $application->run();
exit($exitCode);
This script will be created as part of your application; you're free to edit it to suit your needs. The YII_DEBUG constant can be set to false if you do
not want to see a stack trace on error, and/or if you want to improve the overall performance. In both basic and advanced application
templates, the console application entry script has debugging enabled by default to provide a more developer-friendly environment.
Configuration 
As can be seen in the code above, the console application uses its own configuration file, named console.php. In this file
you should configure various application components and properties for the console application in particular.
If your web application and console application share a lot of configuration parameters and values, you may consider moving the common parts into a separate file, and including this file in both of the application configurations (web and console). You can see an example of this in the advanced project template.
Tip: Sometimes, you may want to run a console command using an application configuration that is different from the one specified in the entry script. For example, you may want to use the
yii migratecommand to upgrade your test databases, which are configured in each individual test suite. To change the configuration dynamically, simply specify a custom application configuration file via theappconfigoption when executing the command:yii <route> --appconfig=path/to/config.php ...
Console command completion 
Auto-completion of command arguments is a useful thing when working with the shell.
Since version 2.0.11, the ./yii command provides auto-completion for the Bash and ZSH out of the box.
Bash completion 
Make sure bash completion is installed. For most of the installations it is available by default.
Place the completion script in /etc/bash_completion.d/:
curl -L https://raw.githubusercontent.com/yiisoft/yii2/master/contrib/completion/bash/yii -o /etc/bash_completion.d/yii
For temporary usage you can put the file into the current directory and include it in the current session via source yii.
If globally installed you may need to restart the terminal or source ~/.bashrc to activate it.
Check the Bash Manual for other ways of including completion script to your environment.
ZSH completion 
Put the completion script in directory for completions, using e.g. ~/.zsh/completion/
mkdir -p ~/.zsh/completion
curl -L https://raw.githubusercontent.com/yiisoft/yii2/master/contrib/completion/zsh/_yii -o ~/.zsh/completion/_yii
Include the directory in the $fpath, e.g. by adding it to ~/.zshrc
fpath=(~/.zsh/completion $fpath)
Make sure compinit is loaded or do it by adding in ~/.zshrc
autoload -Uz compinit && compinit -i
Then reload your shell
exec $SHELL -l
Creating your own console commands 
Console Controller and Action 
A console command is defined as a controller class extending from yii\console\Controller. In the controller class, you define one or more actions that correspond to sub-commands of the controller. Within each action, you write code that implements the appropriate tasks for that particular sub-command.
When running a command, you need to specify the route to the controller action. For example,
the route migrate/create invokes the sub-command that corresponds to the
MigrateController::actionCreate() action method.
If a route offered during execution does not contain an action ID, the default action will be executed (as with a web controller).
Options 
By overriding the yii\console\Controller::options() method, you can specify options that are available
to a console command (controller/actionID). The method should return a list of the controller class's public properties.
When running a command, you may specify the value of an option using the syntax --optionName=optionValue.
This will assign optionValue to the optionName property of the controller class.
If the default value of an option is of an array type and you set this option while running the command, the option value will be converted into an array by splitting the input string on any commas.
Options Aliases 
Since version 2.0.8 console command provides yii\console\Controller::optionAliases() method to add aliases for options.
To define an alias, override yii\console\Controller::optionAliases() in your controller, for example:
namespace app\commands;

use yii\console\Controller;

class HelloController extends Controller
{
    public $message;

    public function options($actionID)
    {
        return ['message'];
    }

    public function optionAliases()
    {
        return ['m' => 'message'];
    }

    public function actionIndex()
    {
        echo $this->message . "\n";
    }
}
Now, you can use the following syntax to run the command:
yii hello -m=hello
Arguments 
Besides options, a command can also receive arguments. The arguments will be passed as the parameters to the action method corresponding to the requested sub-command. The first argument corresponds to the first parameter, the second corresponds to the second, and so on. If not enough arguments are provided when the command is called, the corresponding parameters will take the declared default values, if defined. If no default value is set, and no value is provided at runtime, the command will exit with an error.
You may use the array type hint to indicate that an argument should be treated as an array. The array will be generated
by splitting the input string on commas.
The following example shows how to declare arguments:
class ExampleController extends \yii\console\Controller
{
    // The command "yii example/create test" will call "actionCreate('test')"
    public function actionCreate($name) { ... }

    // The command "yii example/index city" will call "actionIndex('city', 'name')"
    // The command "yii example/index city id" will call "actionIndex('city', 'id')"
    public function actionIndex($category, $order = 'name') { ... }

    // The command "yii example/add test" will call "actionAdd(['test'])"
    // The command "yii example/add test1,test2" will call "actionAdd(['test1', 'test2'])"
    public function actionAdd(array $name) { ... }
}
Exit Code 
Using exit codes is a best practice for console application development. Conventionally, a command returns 0 to indicate that
everything is OK. If the command returns a number greater than zero, that's considered to be indicative of an error. The number returned will be the error
code, potentially usable to find out details about the error.
For example 1 could stand generally for an unknown error and all codes above would be reserved for specific cases: input errors, missing files, and so forth.
To have your console command return an exit code, simply return an integer in the controller action method:
public function actionIndex()
{
    if (/* some problem */) {
        echo "A problem occurred!\n";
        return 1;
    }
    // do something
    return 0;
}
There are some predefined constants you can use. These are defined in the yii\console\ExitCode class:
public function actionIndex()
{
    if (/* some problem */) {
        echo "A problem occurred!\n";
        return ExitCode::UNSPECIFIED_ERROR;
    }
    // do something
    return ExitCode::OK;
}
It's a good practice to define meaningful constants for your controller in case you have more specific error code types.
Formatting and colors 
Yii console supports formatted output that is automatically degraded to non-formatted one if it's not supported by terminal running the command.
Outputting formatted strings is simple. Here's how to output some bold text:
$this->stdout("Hello?\n", Console::BOLD);
If you need to build string dynamically combining multiple styles it's better to use ansiFormat():
$name = $this->ansiFormat('Alex', Console::FG_YELLOW);
echo "Hello, my name is $name.";
Tables 
Since version 2.0.13 there is a widget that allows you to format table data in console. It could be used as the following:
echo Table::widget([
    'headers' => ['Project', 'Status', 'Participant'],
    'rows' => [
        ['Yii', 'OK', '@samdark'],
        ['Yii', 'OK', '@cebe'],
    ],
]);
For details please refer to API documentation.
Found a typo, or you think this page needs improvement?
Edit it on GitHub !
Signup or Login in order to comment.